Every once in a while a vintage guitar ends up on my luthier’s bench at Wimberly Guitar & Luthiery. It’s always a privilege to be able to work on these instruments, and you need to be extra careful with them. When my good friend Jim called and told me he was leaving his Gibson Melody Maker on my back porch, I knew this might be a special guitar, and once upon a time … it was.
In the late 1950’s the Gibson Guitar Corporation needed a mid-priced guitar to compete with Leo Fender’s Musicmaster. And while the Les Paul Jr. was the best selling Les Paul by the end of the 50’s, Gibson needed a beginner’s electric guitar that was a little less pricey. Hence the Melody Maker was born in 1959. And if the Les Paul Junior is little brother to the Les Paul, then the Melody Maker is the less flashy cousin of the Les Paul Junior. The original Melody Maker had a similar body shape, albeit a thinner piece of wood. This guitar has a mahogany body and neck. It lost the upper bout in 1961 and from then until 1971, when the “first run” was over, the Melody Maker had it’s signature “horns”.
Gotta love a guitar with horns.
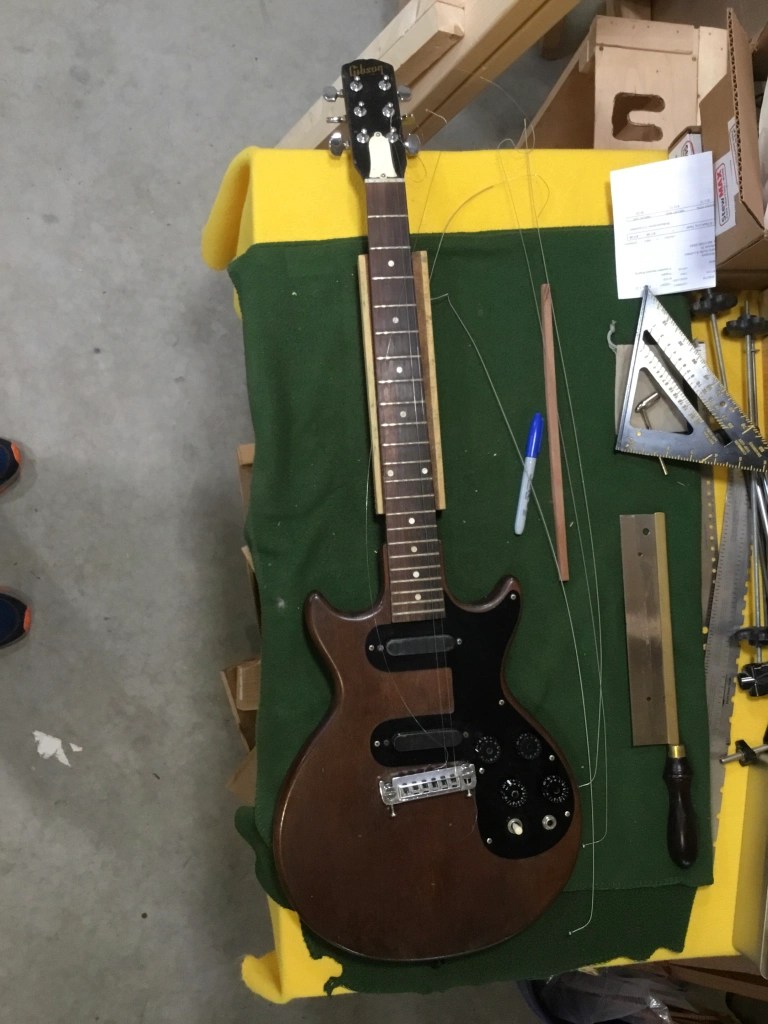
Jim brought me the Melody Maker he needed restored. From the serial number I determined Jim’s guitar was built in Kalamazoo, Michigan in 1962. Jim explained this guitar belonged to a friend who had passed away, and when his friend first acquired the guitar it had been painted with white house paint! He removed the paint and refinished it with some type of brownish/clear varnish or poly. This guitar was not a looker, which is a shame, because those single coil P90 pickups are to die for.
So this guitar needed an intervention, and I was just the man for the job. Turn this drab featureless guitar into a looker. Jim quietly deposited the Melody Maker on my porch one pleasant Sunday afternoon.
It would be a long, long time before this guitar would make it’s way back home …
There are a couple of things that are critical to restoring vintage guitars so their value is enhanced. First of all, the parts need to be original. And when I say original I mean all of it. Finish, hardware, pickups … all of it. The second thing that enhances the value of a guitar is desirability to collectors. I hate collectors. These guys aren’t typically “players” so much as “investors”. It’s a cruel world where guys who own several beautiful guitars aren’t really “players”. I have some teenage students who could show you how to play that thing, but “players” (especially young ones) are priced out of the vintage guitar market by “collectors”.
So Jim’s Melody Maker came to me with issues relative to value. But I’m a player first and foremost … I don’t care so much about value (we’ve established how I feel about collectors)… I care that the guitar plays well and sounds great. But this guitar had some serious challenges. It had been worked on, and it took me a long time to undo what had been done. So Jim’s Melody Maker was a vintage guitar that could never have a vintage value again.
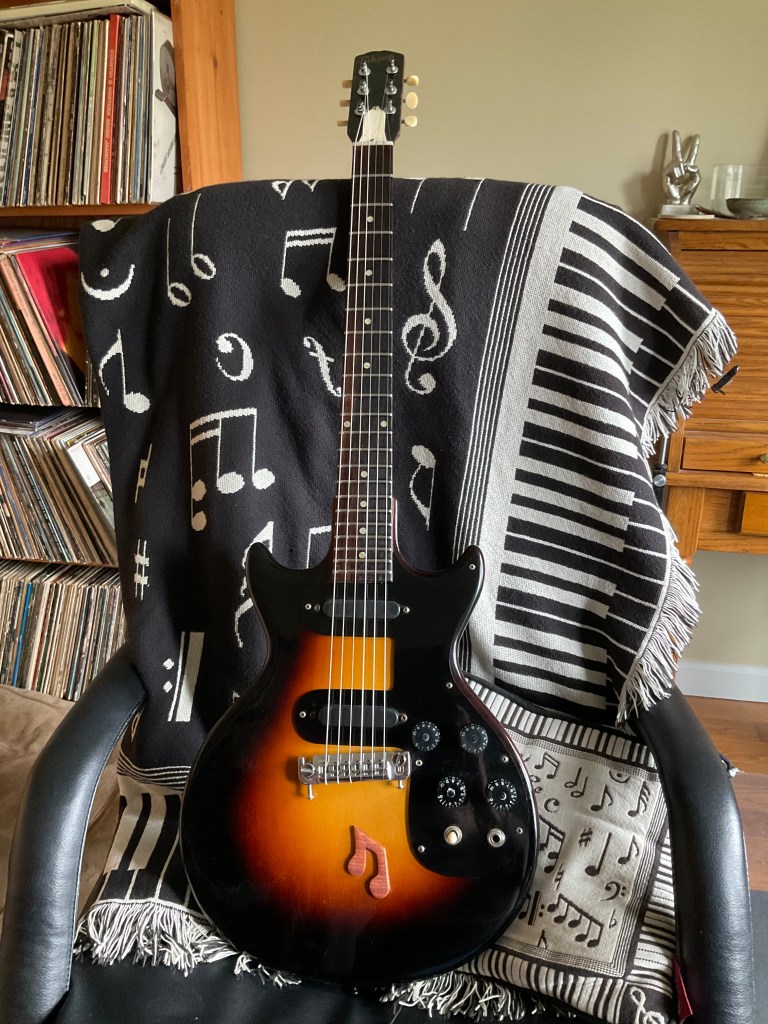
But who cares? This guitar has vintage P90 pickups, and they’re beautiful. It’s a nice thin piece of mahogany that’s light as a feather. The sound on the neck pickup, from the 5th fret to the 12th fret, on the middle 4 strings is absolutely gorgeous.
When it first fell into my hands I plugged it into my Fender Twin and played for hours. As a player primarily (part time luthier) I immediately understood the “value” of this guitar.
Because of this, Jim’s guitar would spend the next 2 plus years on my luthier’s bench for some good… and some not so good,…reasons
First of all … the finish (if you could call it that). Electric guitars are typically finished with nitrocellulose lacquer using heated spray guns to provide multiple layers that melt into each other. When I say multiple layers … I mean it. The more coats applied, the better. The guys who do this aren’t always luthiers … often they’re the same guys who spray custom finishes on automobiles. It’s a similar skill. The equipment is expensive, needs to happen in a sealed and vented “spray room”, and if something sparks while you’re applying the lacquer, well, your house could explode. Really! Most luthiers send their guitars out to be finished and I have none of this equipment. But you can finish guitars with special guitar lacquer spray cans (at about $30 a pop) and I have finished many guitars this way. But when I asked Jim what color he wanted he said sunburst.
I should have run away screaming! But this is why this guitar was on the bench for 2 years. It was a significant learning experience.
On vintage guitars the original lacquer finish becomes “checked” over time. This means there are tiny little lines and cracks in the surface of the finish. You see this when you look up close and sometimes people remove the finish because of this. Bad move! Your guitar just lost 75% of it’s value. There has always been a prevailing thought that the original finish enhances the sound quality of the instrument. There have been arguments that Stradavarius’s violins were special because of the finish. Others believe it’s the glue that was used. And while this makes some sense, I believe it’s the wood that makes them special. The wood in Stradavarius’s violins we’re harvested from the north side of the mountain tops of the Alps during a particularly cold period of time. The rings are much tighter. The wood is harder and resonates differently. It’s the wood folks! Well, that, and the craftsmanship (obviously!).
That said, I think it’s silly to think that a guitar loses so much value if it’s refinished. But that brings us back to “collectors”. A collector would never buy a guitar that doesn’t have it’s original finish. Of course, as stated earlier, collectors are not typically “players”. They’re just rich guys who think a guitar is a static piece of art. They don’t understand that a guitar is never static, but rather it’s an ever changing entity that needs to be played regularly so the resonance over time brings out it’s voice.
A guitar must be played.
So, all that said, about finish, glue, wood, the Alps, et al, Jim’s Melody Maker had been painted with white house paint …. kinda took collectors out of the equation. This was a guitar that was made to be played. It really had no other choice!
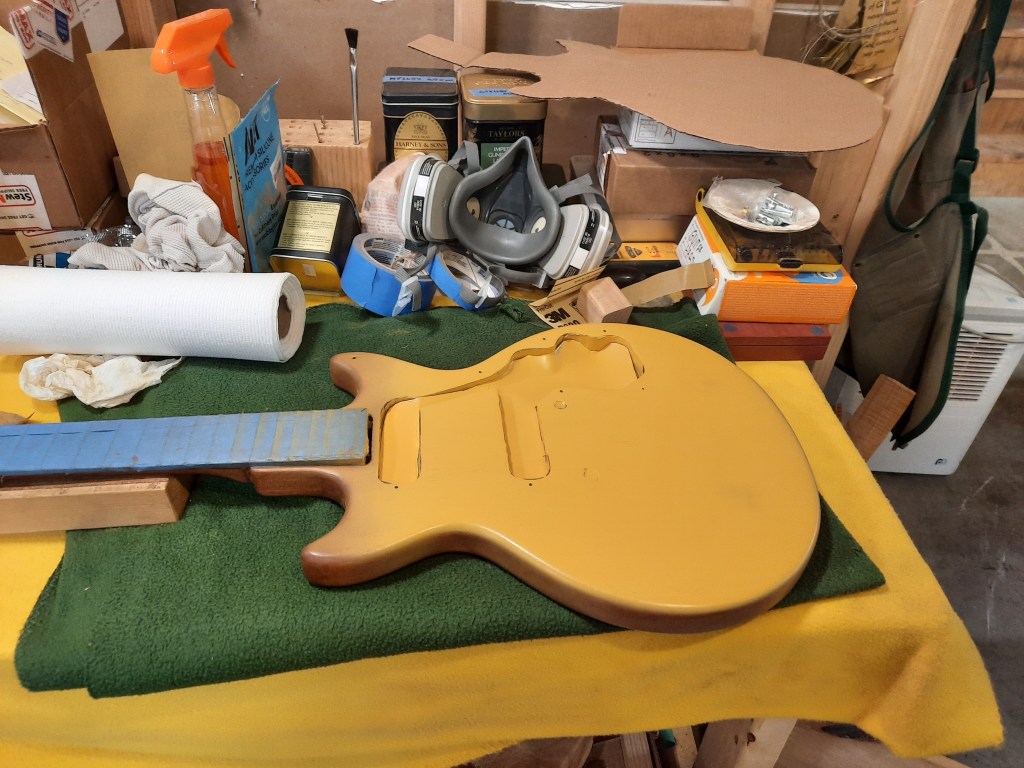
The first step was to remove the finish, gradually transitioning to fine sandpaper. This, of course, brought out all the imperfections. I was surprised to find that Gibson did not use AA mahogany, and actually had some small knots. But then again, the MM was designed to be the entry level Gibson electric solid body … and the body made this a very light guitar, and hence, comfortable to play.
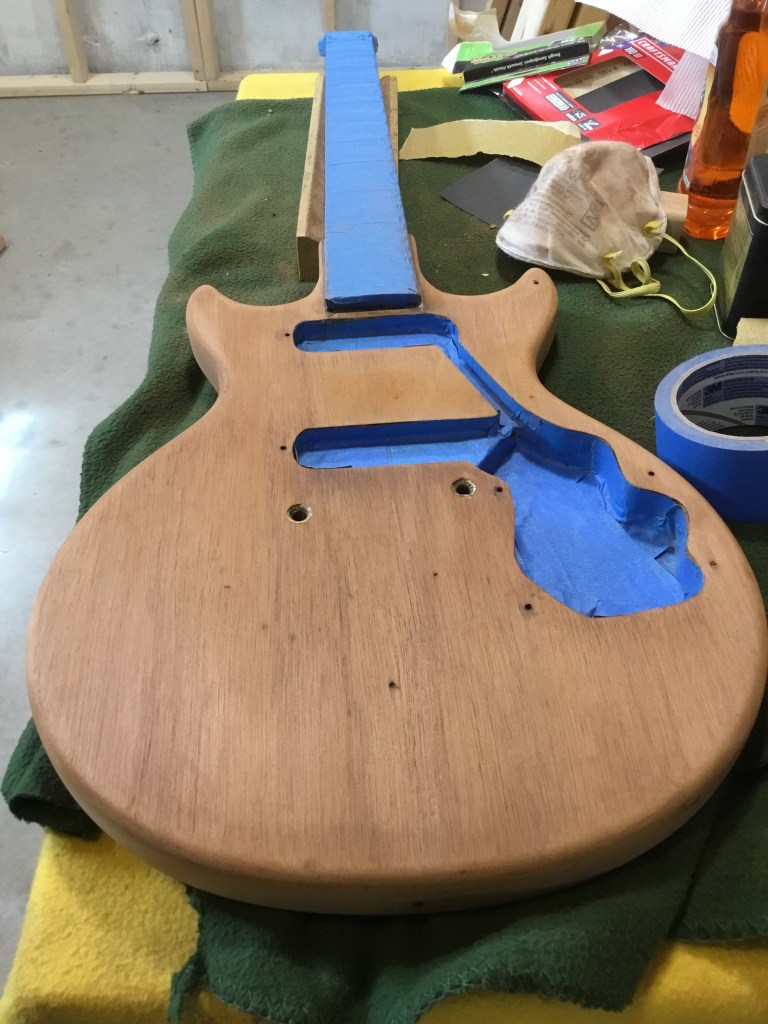
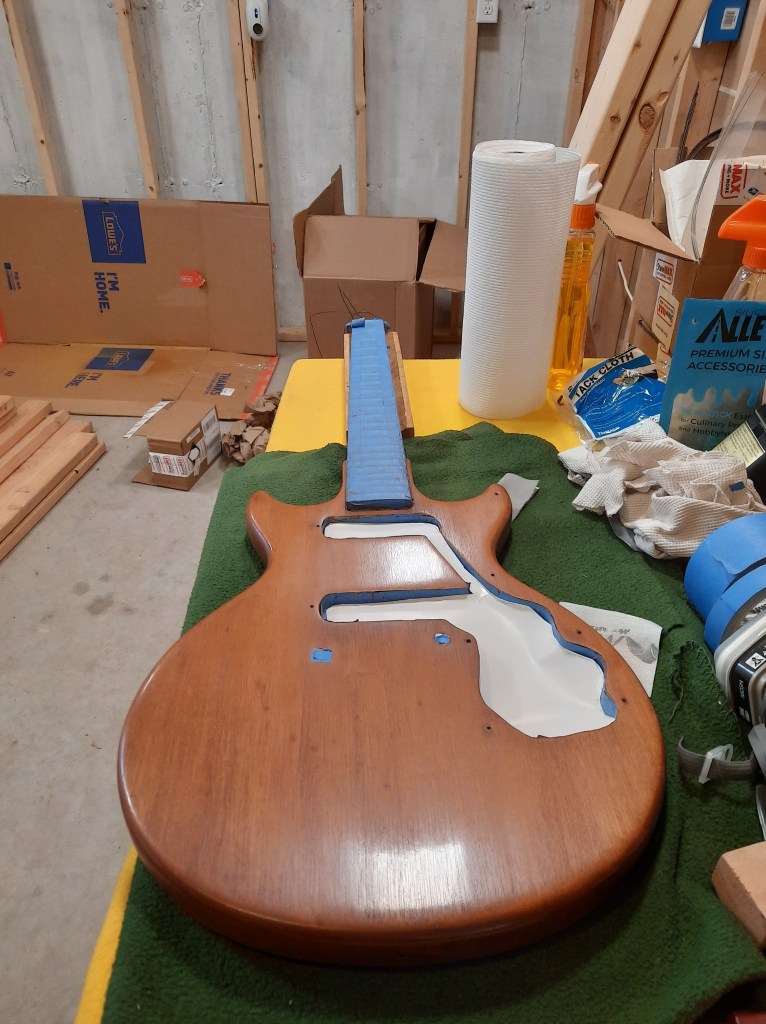
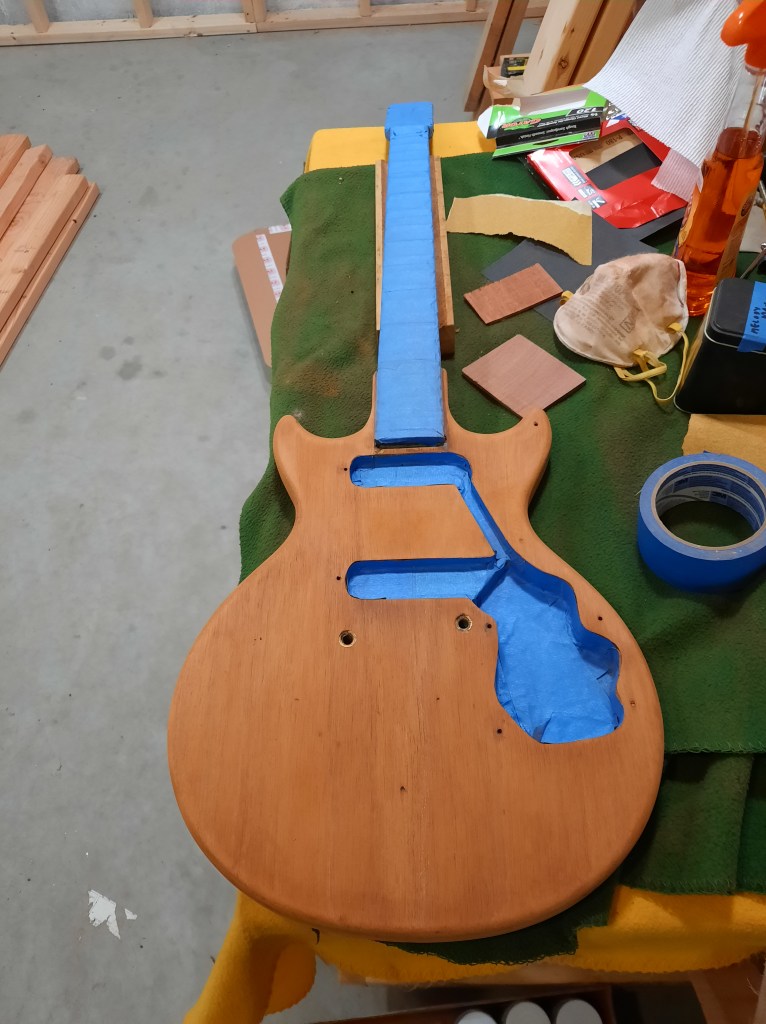
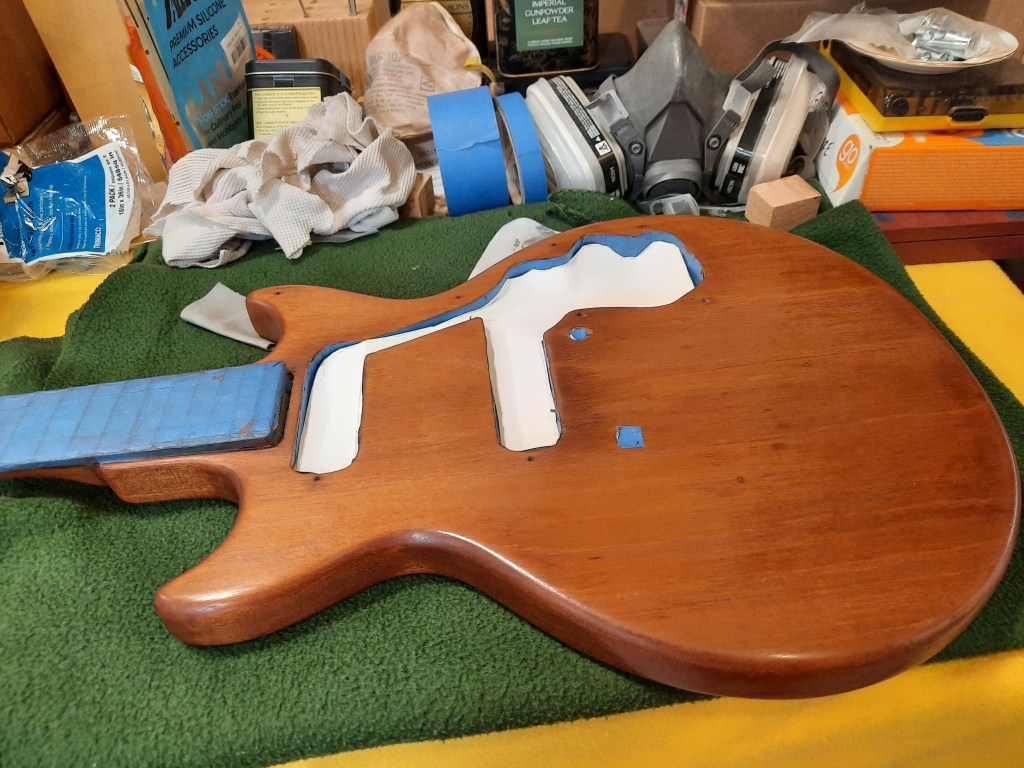
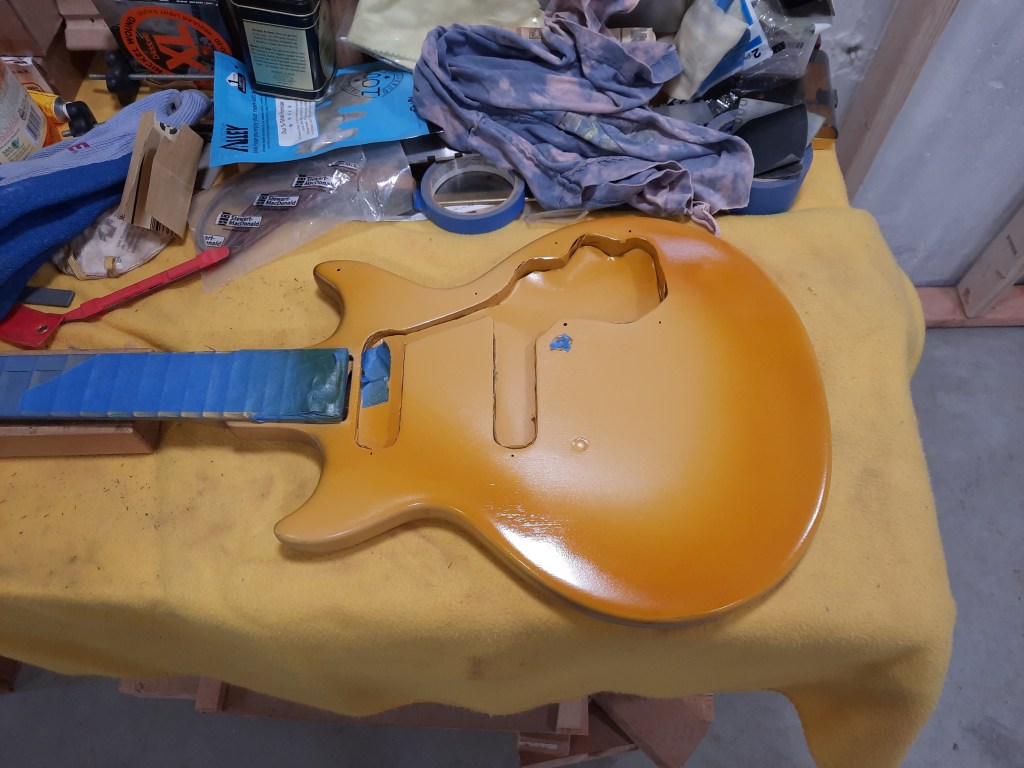
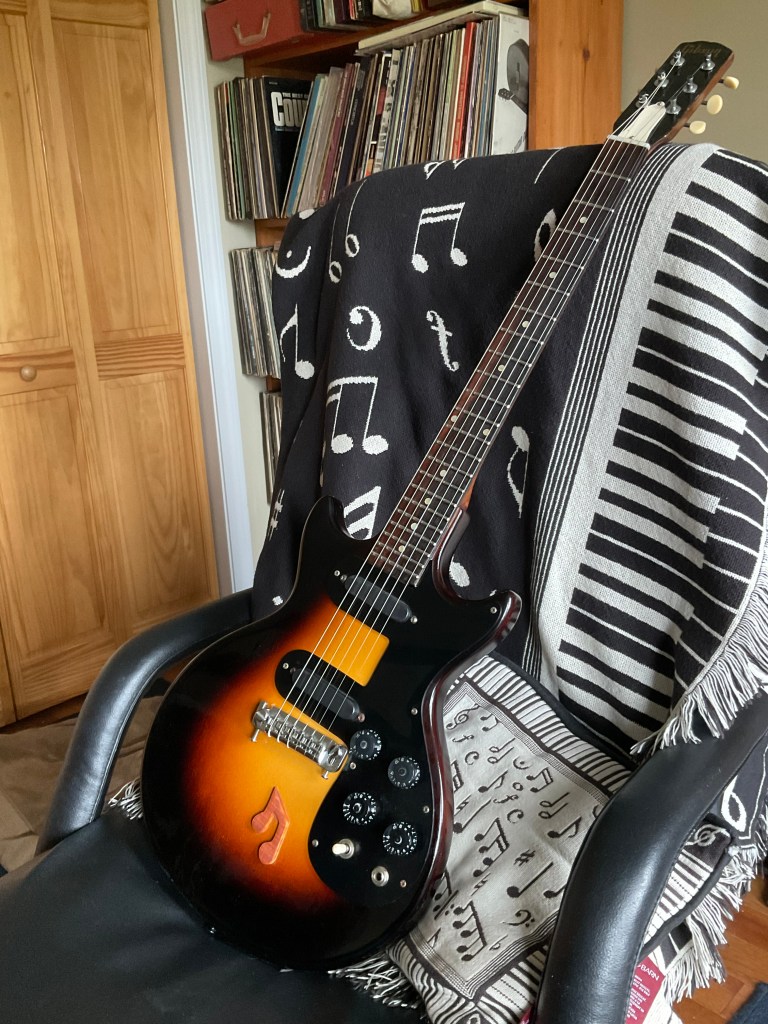
After removing the finish I used mahogany colored wood grain filler to make the surface as smooth as possible. Mahogany is an open grained wood, which means lacquer can settle into the grain and consequently not be “glassy smooth”. Grain filler mitigates this, and allows you to prep and polish the surface of the wood. This is followed by multiple coats of sealer. Then a couple of clear wash coats are applied and polished, followed by multiple coats of “TV Yellow” which serves as the base for the sunburst. This particular color of lacquer was developed by Gibson because in the early days of television, white guitars became invisible on the screen. TV Yellow made guitars show up on the screen. After this a coat or two of Amber is sprayed around the edges, followed by multiple coats of Mahogany Red. The Amber and the Mahogany Red are “feathered” out around the edges with the spray cans. This is the tricky part. One bad move and you’re back to square one. The back is also sprayed with mahogany red. The neck was sprayed with sealer and polished.
There are around 20 coats of lacquer applied. Each coat needs to cure for several days (best case). Spraying lacquer works best when there’s low humidity, around 67 degrees, no breeze (remember, I do this in the garage so hopefully my house doesn’t explode). Conditions are not always ideal. This process is time intensive and, if everything goes just right, should take about 2 months.
So …. How often does everything go just right?!!!
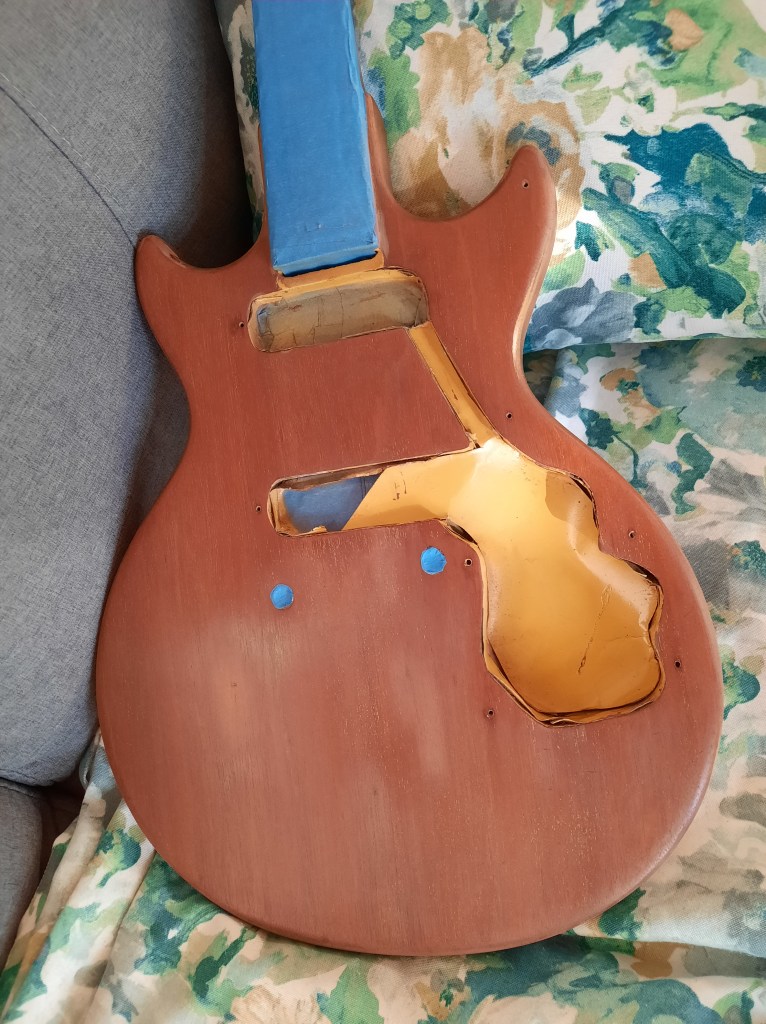
By my count I went back to square one five times. Starting over by sanding the guitar down to bare wood every time. I encountered multiple issues and ultimately realized none of that mattered. There was a fatal flaw (flabbergasting details to follow).

To document the issues encountered:
Attempt 1 ended, when sadly enough, the finish developed a run in the TV Yellow while hanging up to dry. No matter what I did, I could not remove the run.
Attempt 2 ended when, like an idiot, I dropped a spot of lacquer on the nearly finished finish. Burned right through yeti the wood. I did not sleep well that night.
Attempts 3, 4, 5 all ended unsuccessfully when mysterious white spots would appear in the lacquer. Every time I buffed it these spots showed up. Every time I thought that if I did a better job sealing the wood it would work … wrong!
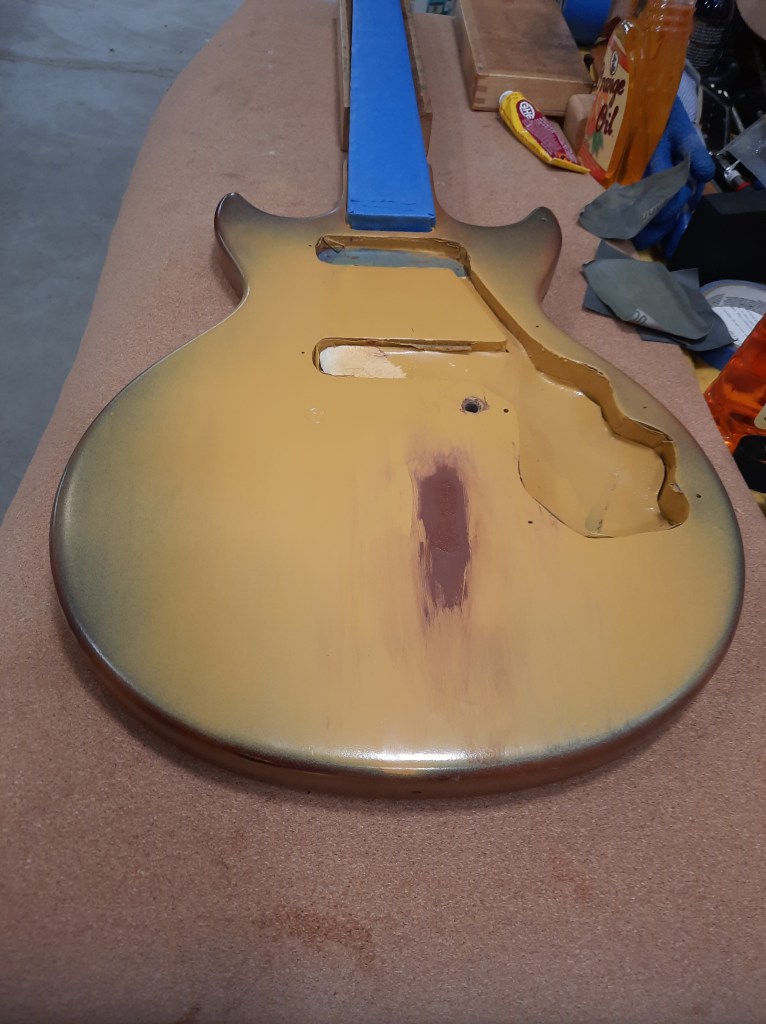
In my frustration I described my plight on several message boards where guitar geeks go to pretend they know what they’re doing. And occasionally impart sage advice. One guy finally responded by asking the leading question: “was this guitar ever painted”? We’ll, yes, yes it was. “White paint, right”? Uh huh. “We’ll you’re never going to fix this”.
He went on to explain that the chemicals from the paint were absorbed deep into the wood and every time I went to buff it, the heat drew it right to the surface….
So, what to do?
My mind flashed to my time in William Cumpiano’s workshop where, after I almost destroyed an OM28 I was building, William created a Dutchman to fix the problem. Like the Dutchman with his finger in the dike, a “Dutchmen” to a carpenter is a fix to a flaw. William said most guitars have a Dutchmen, you just need to find them.
I needed a Dutchmen.
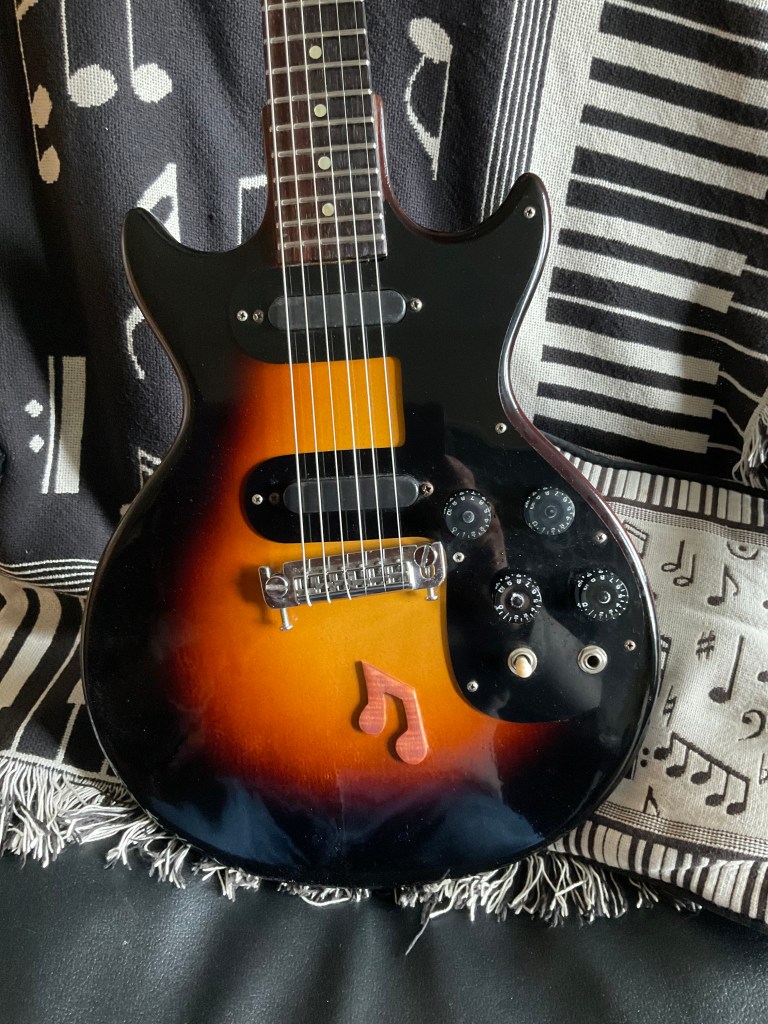
I posed the question to Jim, your initials, a G Clef, a musical note?…. We settled on 8th notes as our Dutchmen.I carved it out of mahagony, and broke it every time! I have a pile of little, broken, mahogany notes. I ended up using maple and stained it with mahogany, glued it to the top …and, finally after 2 years, I moved on to the next step.
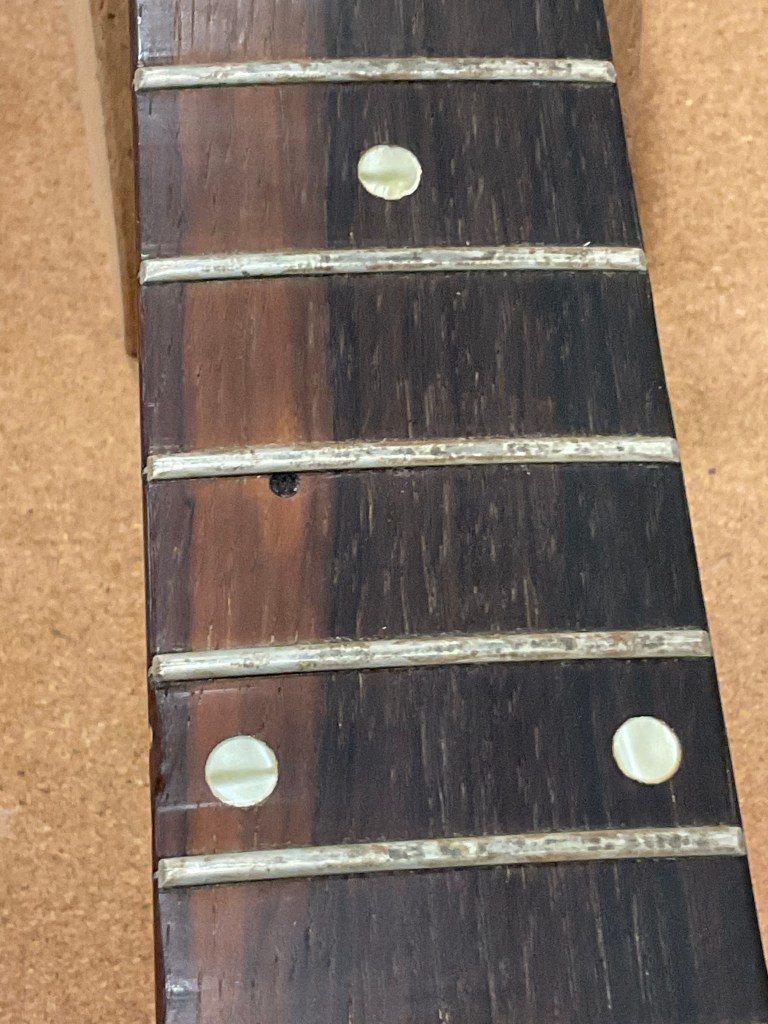
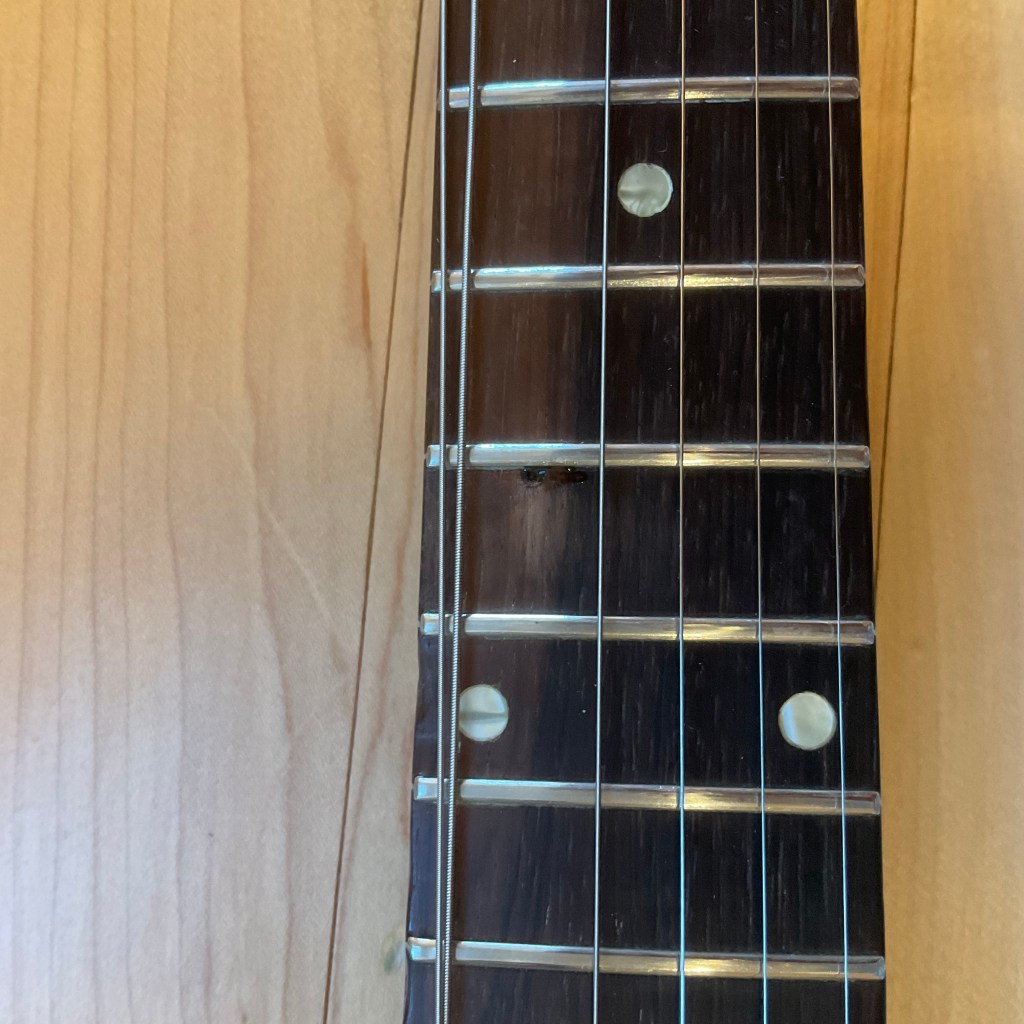
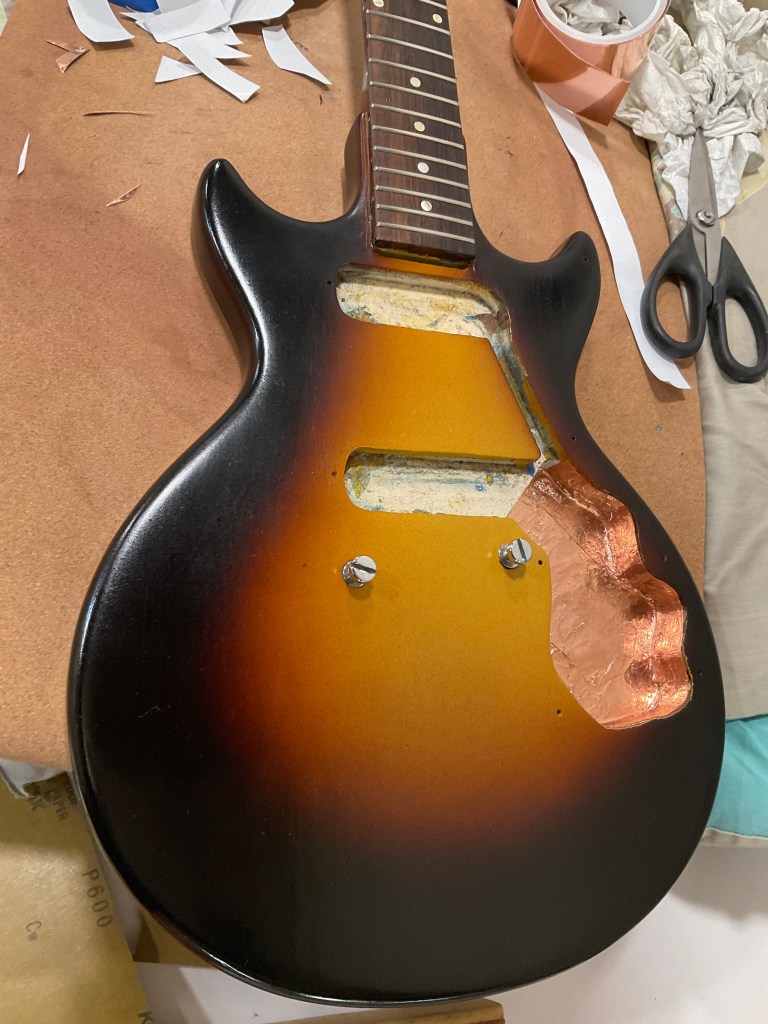
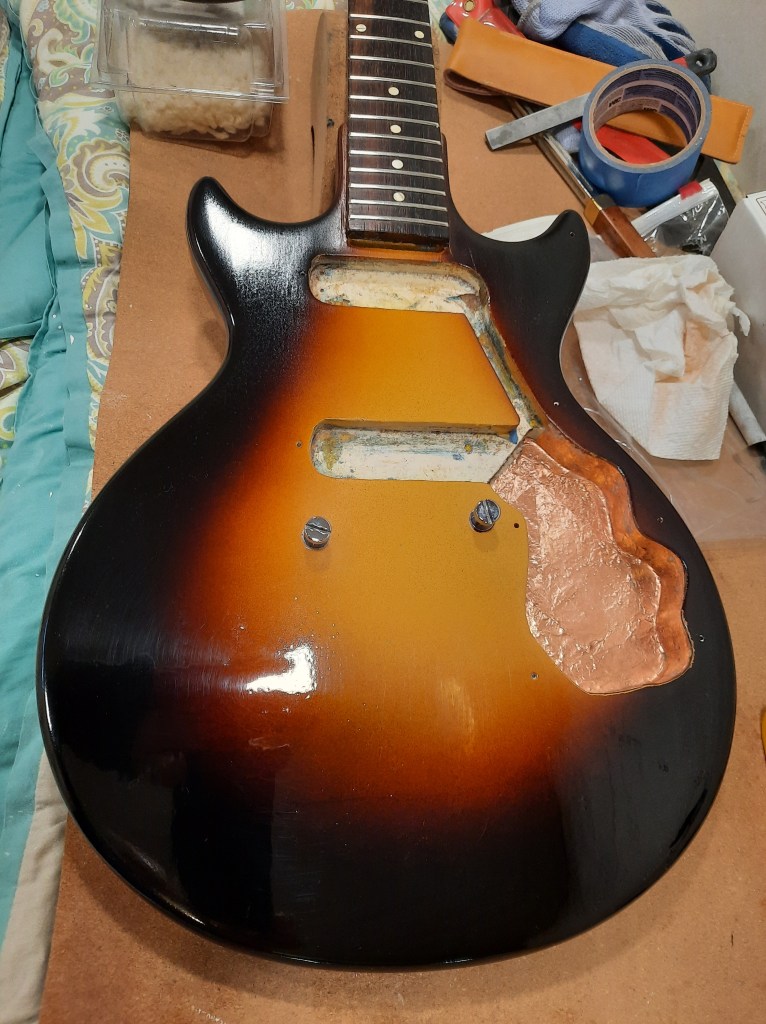
So, after finally finishing the finish, it was on to the rest of the guitar … and somewhat more pedestrian work. To start I checked the neck for true and found it to be in good shape. Next I level, crowned, and polished the frets using fret files, superfine abrasives, and polishing compound. I filled a small hole in the fingerboard with tinted superglue. Next I conditioned the fretboard and polished it. I intonated the guitar by filing the nut to either lengthen or shorten the length of the string, raising or lowering the pitch by microtones. I lined the pickup cavity with special copper tape to limit interference with those wonderful P90’s.
Strung it up and played!
Frets and fingerboard, before and after:
Successive steps of a sunburst finish
This project took 2 years. Much longer than I would ever want or expect a Luthiery project to take. Regardless, I learned a ton, and in the end, the guitar I handed back to Jim was a beautiful guitar. And those P90’s, oh those P90’s…….

Absolutely beautiful work! I feel guilty to mention this as your work is obviously of the highest quality! The pickups you refer to as P90’s are actually Gibson single coils as found in most melody Makers and also Epiphone solid bodies like the Olympic made in the early to mid 60’s. Sort of Strat shaped but not anything like a Fender SC. My friend Tom Brantley, who makes Geddy Lee of RUSH custom signature JB pickups is an expert repair and winder man who has also worked for and with Lindy Fralin, and rewound a pair of these in a 1965 Epi Olympic I restored.
LikeLike
My brother, Jim, had a sunburst Melody Maker very similar to this one. He passed away many years ago, and sadly, I don’t know where it ended up. You did a beautiful job on this one, and it brought up memories of my brother’s. It is definitely a player, as it should be.
LikeLike